During a NetSuite Go-Live, there are a lot of moving parts, and one of the biggest is data migration. While it can be daunting, this is the perfect time to scrub the data coming out of your old system and start things off with good, clean data. This will also have the added benefit of easing the process of mapping and migrating the data from the old system to NetSuite.
Ideally, you’ve chosen a go-live date that coincides with a new accounting period as this will allow the accounting team to close the previous period in the old system and then start entering all new transactions directly into NetSuite. Even so, there are going to be some open invoices during the transition, and it can be confusing to get those entered NetSuite.
At this point, the Chart of Accounts is set up, historical trial balances are loaded, inventory and items are taken care of, and all your vendor and customer records are in. Now it’s time to set up open Accounts Receivable balances so that you can process customer payments directly in NetSuite. While this can be done in a few different ways, a simple and effective method to do this requires three simple steps:
- Create a Non-Inventory for Sale item
- Create Open Customer Invoices
- Reverse the GL Impact with a Journal Entry
1. Create a Non-Inventory for Sale Item
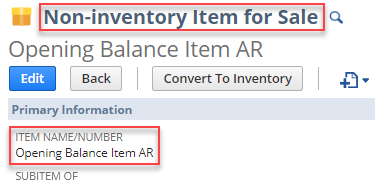
For these invoices, you’ll want to use both a generic item and a generic GL account. You can create the item by navigating to Lists > Accounting > Items > New and select Non-Inventory for Sale. I highly recommend using a name like ‘Opening Balance Item AR’ to make it easily identifiable, thus preventing accidental use in the future.

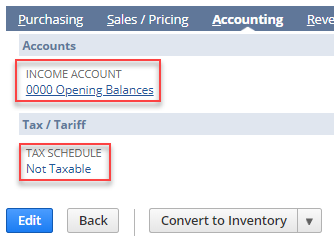
Under the Accounting subtab for the item, select a generic GL account or use the standard NetSuite GL account 3200 – Opening Balance. In this instance, I created a dummy account to use solely for this exercise. Since we’ll be reversing out the impact in step 3, there won’t be any downstream issues. Also, make sure that the item is not taxable.
Leave all the other information (like price and description) blank. That comes into play in the next step.

2. Create Open Customer Invoices
This step is simple. For each open invoice you input, you’ll need the following data points:
- Invoice Number
- Customer
- Due Date
- Amount Remaining
- Description or Memo
Because we’ve already imported Trial Balances, we’ll want to reverse out the impact of these invoices, and that’s easier to do if everything is in the same period. For each invoice, set the invoice date to the day before your go-live and then use the dummy item we created earlier to represent the original invoice. The details of that original invoice will be entered on the single line. Use the Description or Memo field to add details around original date, total amount due, etc. For the Amount, use the remaining balance due instead of the full amount from the original invoice. This way you have an open invoice to receive payments against that is accurately capturing only the remaining balance.
3. Reverse the GL Impact with a Journal Entry
Now that you have all of the open invoice loaded into NetSuite, you need to reverse out their GL Impact with a Journal Entry. Simply total the full value of all invoices that were entered and create a Journal Entry that debits the Income Account set on the item in Step 2 and credits your Accounts Receivable account. Set the date on the Journal Entry to the day before go-live.
And that’s it! You’ve now entered your Open Accounts Receivables into NetSuite for your go-live. Hopefully this process seems less daunting than it did previously. Feel free to contact us with your thoughts or questions at info@squareworks.com.
About the Author
Matt Nelson is a Functional Consultant at SquareWorks Consulting. He is a passionate IT professional with over 10 years of experience in Corporate and Technical Training. He has trained on and helped implement both Salesforce and NetSuite. Matt is based out of Boston, MA.


