There’s a good chance that you’re looking for ways to automate and simplify your accounting processes, and NetSuite provides a range of tools to help. One of these tools includes Expense Allocation Schedules. In a recent blog post, we analyzed the high-level benefits and limitations of Expense Allocation Schedules to determine if they would be a good fit for your company. If you would like to learn more, read part 1 here.
Now that you’ve determined Expense Allocation Schedules are a good fit for your company, we will start out with the most basic type in NetSuite, which is a Fixed Schedule. In today’s blog post, we will walk through the user experience in NetSuite and an example to help determine if this tool is beneficial for your company.
What are Fixed Schedules?
Fixed Schedules will allocate expenses across accounts or segments based on a defined, or fixed, breakout each month. A great example of this is rent. This recurring expense is typically spread across the various departments of a company. Assuming there aren’t frequent changes in the company structure, the weighted amount to be allocated to each department can be defined directly on the Expense Allocation Schedule and manually updated as needed.
Fixed Schedules: Subtabs
The Expense Allocation Schedule’s behavior is controlled by two subtabs:
- Source
- Destination
We’ve included examples below to explain the two subtabs further.
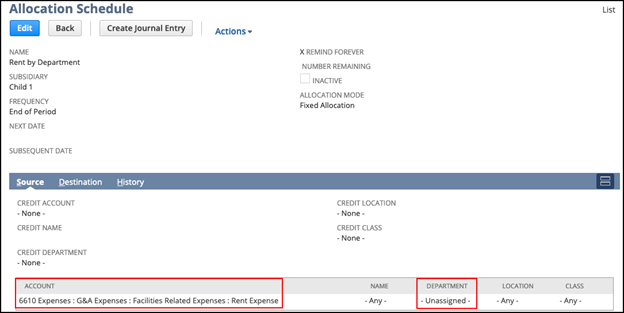
1. Source Subtab
In this example, we indicated that the Source account to allocate from is “6610 Expenses: G&A Expenses: Facilities Related Expenses: Rent Expense”. This should apply to any transaction hitting 6610 for any name, location, or class, where the department was unassigned. If we wanted to take this a step further, another option would be to specify segment values instead of -Unassigned- or -Any-.
2. Destination Subtab
In this example, we indicated which departments the expense should be allocated to. We want the expense to remain in the same account from the Source tab, so instead of selecting that account on each line, we simply marked Use Source/Credit Account(s) and NetSuite keeps the original account(s) when creating the allocation journal. If different destination accounts are needed, they can be set at the line level instead.
We also defined the weighted amount as a percentage that each department will have allocated. The result is an allocation entry that credits account 6610 with no department and a weighted debit to 6610 for each department assigned on the Destination tab. Please note, if marking the Values Are Percentages checkbox, the weight column must add up to 100.
Fixed Schedules: Setting Reminders
A pre-built reminder shows how many allocation schedules are ready to run each month.
To do this:
- Click on the reminder to be taken to a list of schedules
- Select which schedule to run
- NetSuite will automatically sift through all transactions in the system that meet the defined Source criteria and create a single adjustment journal to capture the needed allocations
All it takes is the click of a button!
Fixed Schedules: History Tab
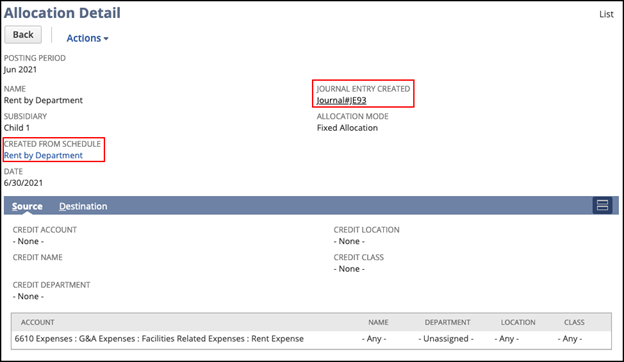
The history tab will show a list of all journals that have been created from this schedule, with links to the transaction and to the allocation detail.
Conclusion
Expense Allocation Schedules can save you time by automating and simplifying your accounting processes. If you’re just getting started with Expense Allocation Schedules in NetSuite, try out the most basic, Fixed Schedules and build from there.
Need help understanding or building Expense Allocation Schedules and various tools in NetSuite? Contact us at info@squareworks.com today! Stay tuned for part 3 of 4 where we will dive deeper into Dynamic Schedules.


