Are you a non-technical person who occasionally dabbles with Advanced PDF Templates or flirts with Advanced Searches? Some of the more basic, repetitive skills are almost second nature to you, but when you try to do something a little more advanced you spend too much time digging around in NetSuite because you’re not sure how it’s all connected? NetSuite’s Schema Browser is going to be your new best friend.
SuiteAnswers’ description of the Schema Browser is spot on:
“The SuiteTalk Schema Browser provides a summary of all records, sublists, and other objects available in SuiteTalk. Information about each object is displayed as a series of tables, both for ease of browsing and to provide additional details compared with what is available in the WSDL.”
The Schema Browser is a great resource to bookmark, as you’ll be returning to it repeatedly. It provides essential information on where and how things are stored in the database. This means you can find field IDs, available search columns, etc. for most records in NetSuite. The practical application of this information goes from saved searches and reports to custom scripts in SuiteTalk.
Let’s go through a real-life example:
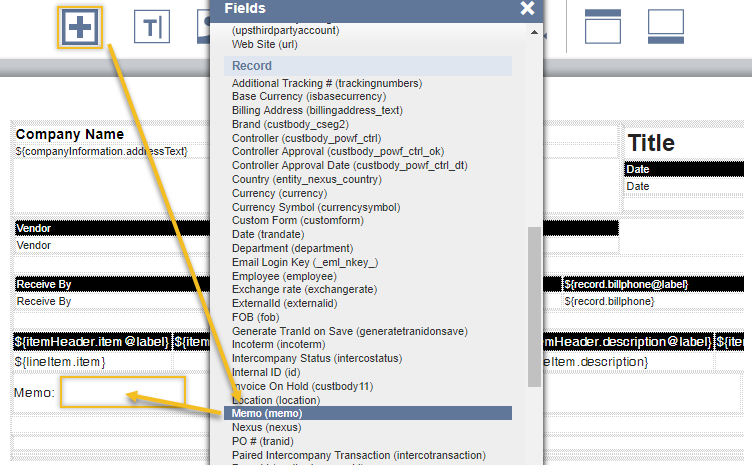
Let’s say we’re working on an Advanced PDF/HTML Template and want to dynamically pull in fields from the Purchase Order. After pulling up the template, it’s fairly straightforward to add the basic fields from the PO to the template using the ‘Add Fields’ button.
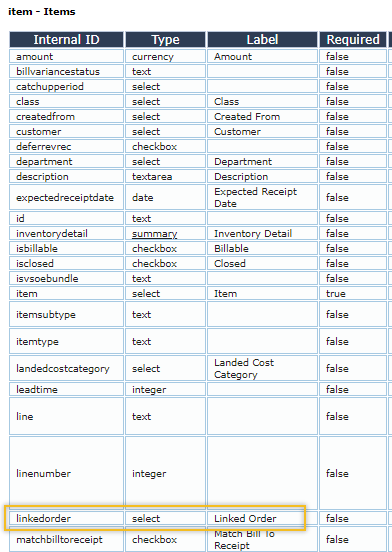
But adding information from the Item Sublist isn’t as easy. This is where the Schema Browser comes in. We want to add in the PO number of any linked orders, which can be seen on the line item in the Items Sublist.
First, switch from the WYSIWYG view to the Source Code view in the template editor.
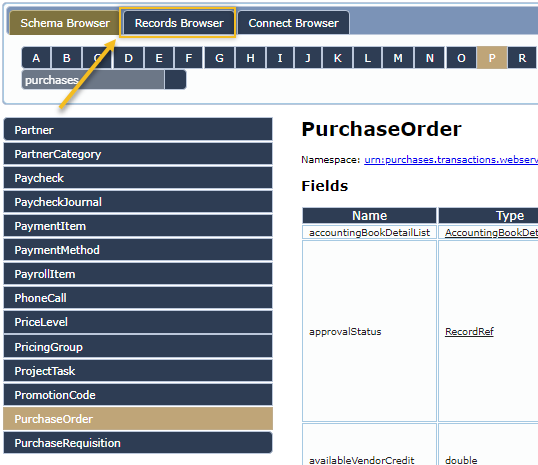
Next, open the Schema Browser and navigate to the Purchase Order page using the alphabetical list at the top of the page, then clicking on “PurchaseOrder” in the menu on the left. You’ll notice that sublists aren’t displayed on the Schema Browser, so instead click on the Records Browser tab. Scroll to the bottom of the page to find the Sublists.
You’ll be able to see here that the field ID for Linked Order is linkedorder (not all field IDs are as logical!).
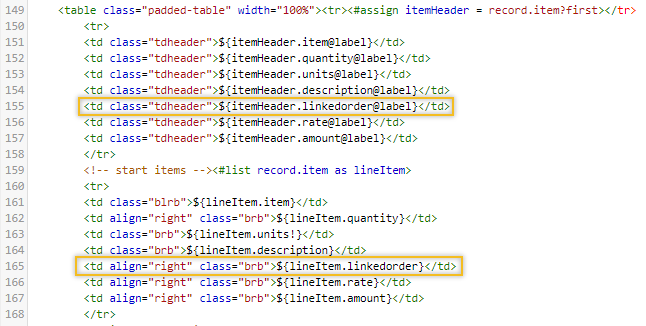
Now that we know the Internal ID, we can add that into the source code of the PO Advanced PDF/HTML Template. In the header of the table we add “@label” to the end of my Freemarker tag in order to display the field label on our form, and then reference the field in the body of the table.
Show Internal ID
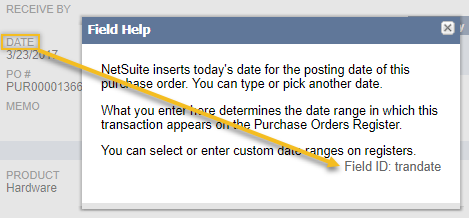
If you’re looking to do something a little easier and all you need is the name of a field, then there’s a quicker way. It’s always a good idea to enable ‘Show Internal IDs’ (in NetSuite, go to Home > Set Preferences. In the Defaults section, check ‘Show Internal IDs’).
While this can’t be set to display at a company level and most folks will never user them anyway, if you work with web services or SuiteScript then you’ll be referencing many of these Internal IDs in your code. They’re also helpful when prepping CSV imports or even during screen share troubleshooting sessions! You can view the Internal ID for a field by clicking on that field’s label to open the field level help popup window.
The internal ID is displayed in the lower right corner of this window. Showing Internal IDs doesn’t pose a security risk and it’s often very helpful.
About the Author
Matt Nelson is a Functional Consultant at SquareWorks Consulting. He is a passionate IT professional with over 10 years of experience in Corporate and Technical Training. He has trained on and helped implement both Salesforce and NetSuite. Matt is based out of Boston, MA.


